
Gabion planters have been used for centuries to add interest to gardens and landscapes and they are surprisingly easy to make too. The word gabion is derived from the Latin word gabion, which means “big cage”. Well that makes sense They’re usually filled with rocks or other organic stuff and I think they look stunning in the garden.

What Is Gabion and How Can I Use It in My Yard?
Gabion is an up-and-coming landscape trend that uses wire baskets filled with rocks to create a unique-looking retaining wall. It’s an attractive, effective, and inexpensive addition to any yard. Gabion is praised for being both beautiful and environmentally friendly. It requires no concrete or mortar and can be made with discarded rubble from local excavation projects. Gabion is also extremely affordable, often costing nothing more than the price of the wire cages.

Once in place, gabion will last the lifetime of your garden. The loose stones are permeable, and the metal cages prevent the rocks from washing away. Gabion conforms to ground movement, helping it to remain beautiful for generations to come.
DIY Gabion Basket Ideas
Gabion can be reinvented for many different uses in the garden, including:
Retaining walls: The original purpose of gabion walls—to retain slopes—remains a popular use for them in residential landscaping. The texture of the stone and wire baskets offers a rough, industrial look in the best possible way.
Benches: Tucking gabion cages underneath a polished wooden board or stone slab is a simple way to create beautiful, modern benches on your property.
Flower bed edging: Instead of a traditional raised stone border, you can edge your flower bed with gabion cages. This is an affordable DIY project that looks particularly pleasing with modern, rustic, or industrial home designs.
Planters: It’s easy to make a gabion planter box. First, build the wire cage and situate a block of polystyrene in the center. Place a plastic flower pot on top, and fill in the area around it with stones. To complete the DIY gabion basket, fill the pot with soil and plant whatever flowers you want.
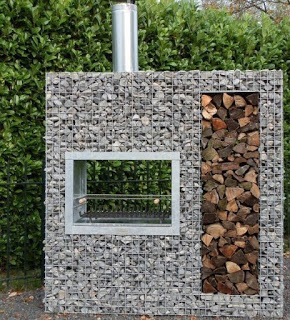
Visual statements: Stone has a lovely color and texture that complements foliage quite well. This makes gabion the perfect garden accent, whether you use it as a decorative column, backdrop for landscape art, or privacy wall.
No matter how you choose to use this landscaping trend, gabion looks best if you keep the other parts of your yard tidy.
The use of Gabion construction has become popular in recent years for residential building and landscaping. The modern, industrial and natural look of this technique, as well as the versatility and the ability to do-it-yourself makes it a great option to consider!
Gabion baskets are so versatile, you can create just about any shape and size to suit your function. Either buy pre-made mesh baskets or make them yourself using galvanised mesh and heavy duty wire. Shape them into curves or stack baskets on top of each other, the options are endless!
How to build a Gabion structure?
Depending on the size and purpose of your Gabion wall it’s best to speak to an expert on how you should prepare the foundations or pad for your wall.
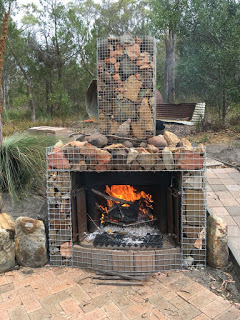
If the wall is to be used as a small decorative feature for say a letterbox or firepit, then you wont necessarily need to dig out and set into a concrete foundation. But if you are building a retaining wall, tall fence or freestanding wall then you may need to dig a foundation and set with concrete, including reo bars to protect the structure from ground movement.

Drainage should also be considered, especially when dealing with slopes.
What you’ll need
Pre-made galvanised Gabion mesh cage/baskets
OR
DIY with Reinforcing mesh and wire to make spiral joiners and tension wires
Stones/Rocks/Rubble
Optional
Bricks or concrete blocks for centre of cage
Weed matting
Pliers
Stringline
Rust kill solution – to protect the ends of the wire and mesh
Reo bars
Cement and blue metal
Drainage materials
Things to consider before starting
What material will you use to fill the cages? Smooth river rocks, large flat edge rocks, broken up concrete, recycled bricks, cut timber logs, even recycled materials such as old wine bottles stacked on top of each other, old clay pipes and roof tiles.
Think carefully about the colour of the material and where it will be positioned. Match the tones of your house with the colour of the stones you chose… warm tones vs grey tones etc.
Consider the size of the basket to the size of rocks/stones to be used. If the mesh has large holes and you plan to use small stones you may need to inlay panels of smaller mesh so that the stones don’t fall through.
Look at putting a garden edging in front of the pad to keep grass from growing through the wall.
Step 1: Level the GroundThe first thing you will need to do is level the ground where you want to build the retaining wall. If the soil is quite hard in consistency, you should be able to build on what’s there. If it’s on the slippery side, however, you should replace about 150mm of the top layer with compacted crushed rock for better support.
Step 2: Keep the Grass Out If you’re building the wall in a location that is quite close to grass, you might want to take steps to prevent it from getting up into the gabion basket. Some powder coated edging can be placed into a trench along the sides where grass is present and the addition of weed matting over the base is also a great idea.
Step 3: Assemble the Cages You will need to put the baskets together before placing them onto the base you have prepared.
Step 4: Pack the RocksYou can begin packing the baskets with your natural stone selection. It’s a good idea to save those with a flatter face for lining the exposed faces of the basket, particularly if they’ll be visible. Some people use old concrete blocks and bricks to bulk out the center of the cage, but you can completely fill them with stone if desired.
Step 5: Finishing Touches Once you’ve finished packing the gabion basket you will be able to wire the lid on and you’re finished! You may need to repack a little to ensure that the lid sits flat. If your retaining wall is going to be two baskets high, you can put the next one together and then place it on top of the finished cage before filling, or you can tie the side walls of the next basket to the side walls of the lower basket thereby avoiding doubling up the mesh between the baskets. This will save in the overall cost of the wall.
Get creative!
Use different coloured rocks or stones to create a pattern in the wall, you can even inlay other materials to make a feature going through the wall.
Insert outdoor led lighting within the basket so that at night your wall glows with light shining through the stones.
Future-proof by placing electrical conduit into the basket/cage so that you can wire in deck lights or power a water feature.
Attach wall hanging planters to the outside of the cage and grow your herb garden or decorative plants on the Gabion wall.
Place old metal objects within the visible sides of the basket. It will create an interesting talking point or “treasure hunt” for visitors and kids to find all the hidden objects.

